


Table of Contents
- Gather Your Tools and Materials
- Prepare the Room
- Score the Wallpaper
- Apply the Wallpaper Removal Solution
- Scrape Off the Wallpaper
- Remove Residual Adhesive
- Clean and Dry the Walls
- Tips for Stubborn Wallpaper
- Conclusion
- Faq's
Removing wallpaper can seem like a daunting task, but with the right tools and techniques, it can be done efficiently. Whether you're updating your home decor or preparing walls for a fresh coat of paint, the process doesn't have to be overwhelming.
This article will provide you with step-by-step instructions and useful tips to make wallpaper removal easy and hassle-free, ensuring you achieve a smooth and clean surface. By following these instructions, you'll be able to transform your walls and give your home a fresh new look with minimal effort and stress.
Gather Your Tools and Materials
Before you begin, it's essential to gather all the necessary tools and materials to make the wallpaper removal process smooth and efficient. Here's what you'll need:
 Wallpaper Removing Tools
Image Source: Pinterest
- Wallpaper scraper or putty knife: These tools are crucial for scraping off the wallpaper without damaging the wall underneath.
- Scoring tool: This tool helps create small holes in the wallpaper, making it easier for the removal solution to penetrate and loosen the adhesive.
- Sponge or spray bottle: A sponge is useful for applying the removal solution, while a spray bottle ensures even saturation of the wallpaper.
- Hot water: Hot water helps activate the removal solution, making it more effective.
- Wallpaper removal solution or white vinegar: You can either purchase a commercial solution or use a mixture of hot water and white vinegar, which is a natural and cost-effective alternative.
- Drop cloths or plastic sheeting: Protect your floors and furniture from debris and water damage by covering them with drop cloths or plastic sheeting.
- Painter's tape: Use painter's tape to secure the edges of the drop cloths and to cover electrical outlets and switches, preventing any water or solution from seeping in.
- Protective gloves: Wear protective gloves to safeguard your hands from the removal solution and to avoid skin irritation.
- Ladder (if needed): A ladder will help you reach high areas and ensure you can remove wallpaper from the entire wall surface.
Prepare the Room
Proper preparation is key to protecting your floors and furniture during the wallpaper removal process. Follow these steps to get the room ready:
 Prepare Room for Wallpaper Removal
Image Source: Pinterest
- Remove all furniture: Take out any furniture from the room to prevent it from getting damaged or dirty. If removing furniture is not possible, cover it with plastic sheeting to protect it from debris and water.
- Lay drop cloths on the floor: Spread drop cloths or plastic sheeting on the floor to catch any debris and water. This will make cleanup easier and protect your flooring from damage.
- Secure the edges with painter's tape: Use painter's tape to secure the edges of the drop cloths to the baseboards. This will keep the drop cloths in place and prevent any water or solution from seeping underneath.
- Cover electrical outlets and switches: Apply painter's tape over electrical outlets and switches to protect them from water and solution. This step is crucial for safety and prevents any electrical hazards.
Score the Wallpaper
Scoring the wallpaper is an important step that helps the removal solution penetrate and loosen the adhesive effectively. Here's how to do it:
 Scoring Tool
Image Source: Pinterest
- Use a scoring tool: Gently press the scoring tool against the wallpaper and move it in a circular motion. This will create small holes in the wallpaper without damaging the wall underneath.
- Work systematically: Start at the top of the wall and work your way down, ensuring you cover the entire surface. This methodical approach will make the removal process more efficient.
- Apply light pressure: Avoid pressing too hard with the scoring tool, as this can damage the wall. Light, consistent pressure will create enough holes for the removal solution to work effectively.
Apply the Wallpaper Removal Solution
Applying the removal solution is a critical step in loosening the adhesive and making the wallpaper easier to remove. Follow these instructions for the best results:
 Wallpaper Removal Solution
Image Source: Pinterest
- Mix your solution: If you're using a commercial wallpaper removal solution, follow the manufacturer's instructions for mixing. If you prefer a DIY solution, mix equal parts hot water and white vinegar in a spray bottle.
- Saturate the wallpaper: Thoroughly spray the wallpaper with the removal solution. Ensure the wallpaper is evenly saturated to allow the solution to penetrate the adhesive effectively.
- Let it sit: For the best results, let the solution sit on the wallpaper for 10-15 minutes. This waiting period allows the solution to break down the adhesive, making the wallpaper easier to scrape off.
- Reapply if necessary: For particularly stubborn wallpaper, you may need to reapply the solution and wait a few more minutes before attempting to remove it.
Scrape Off the Wallpaper
After allowing the removal solution to penetrate and break down the adhesive, it's time to start scraping off the wallpaper. Here's how to do it effectively:
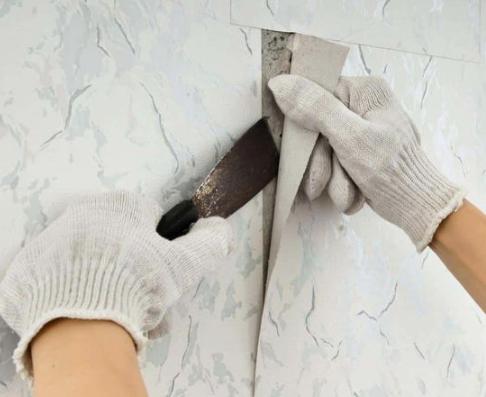 Scrape the Wallpaper
Image Source: Pinterest
- Start from a corner or seam: Identify a corner or seam where you can begin lifting the wallpaper. This is usually the easiest place to start because the edges are already somewhat loose.
- Use a wallpaper scraper or putty knife: Gently insert the scraper or putty knife under the edge of the wallpaper and start lifting it away from the wall. Be careful not to gouge or damage the wall surface.
- Work in small sections: To avoid overwhelming yourself and to ensure thorough removal, work in small sections. This method allows you to focus on fully removing the wallpaper from one area before moving on to the next.
- Apply more solution if needed: If you encounter a particularly stubborn section of wallpaper that won't come off easily, spray more removal solution onto it. Wait a few additional minutes to allow the solution to further soften the adhesive before trying to scrape it off again.
- Be patient and gentle: Patience is key during this process. Rushing can lead to damaging the wall or missing sections of adhesive that could cause issues later.
Remove Residual Adhesive
After the wallpaper is removed, you might find some adhesive residue left on the walls. Removing this residue is crucial for achieving a smooth finish. Follow these steps:
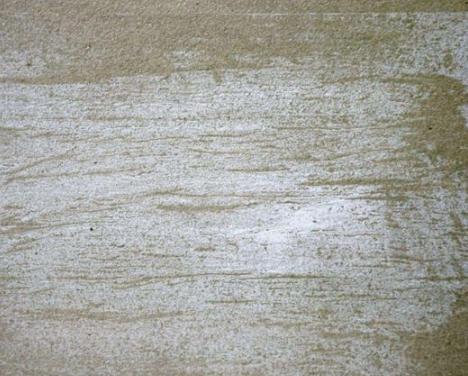 Remove Residual Adhesive
- Soak a sponge in hot water: Fill a bucket with hot water and add a small amount of wallpaper removal solution or white vinegar. Soak a sponge in this mixture.
- Scrub the adhesive residue: Use the soaked sponge to scrub the walls where adhesive residue is present. Apply gentle pressure and scrub in circular motions to lift the adhesive.
- Rinse the sponge frequently: To avoid spreading the adhesive around, rinse the sponge frequently in the hot water mixture. This ensures that you're using a clean sponge to remove the residue effectively.
- Repeat as necessary: For areas with a lot of residue, you may need to repeat the scrubbing process several times. Reapply the solution and continue scrubbing until the walls are completely clean.
Clean and Dry the Walls
Once all the adhesive has been removed, it's important to clean and dry the walls properly before proceeding with any new wall treatments. Here's how to do it:
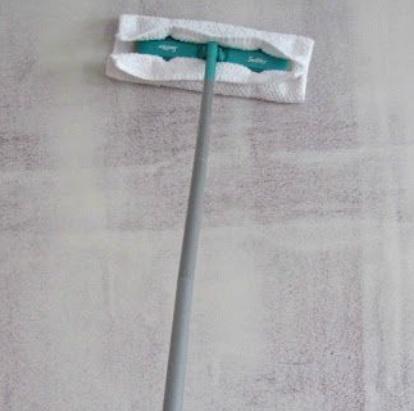 Dry the Walls
Image Source: Pinterest
- Wipe down with a clean, damp sponge: Use a clean, damp sponge to wipe down the entire wall surface. This helps remove any remaining traces of the removal solution and adhesive.
- Dry the walls thoroughly: Allow the walls to dry completely before painting or applying new wallpaper. Proper drying is essential to ensure that any new wall covering adheres properly and to prevent mold or mildew growth.
- Check for smoothness: Run your hand over the walls to check for any remaining rough spots or residue. If you find any, repeat the cleaning process until the walls feel smooth and clean.
Tips for Stubborn Wallpaper
Sometimes, you might encounter particularly stubborn wallpaper that resists standard removal techniques. Here are some additional tips to handle these situations:
 Tips for stubborn Wallpaper
- Steam Method: If the wallpaper is extremely difficult to remove, consider using a wallpaper steamer. This device produces steam that penetrates the wallpaper, loosening the adhesive and making it easier to scrape off. Hold the steamer against the wallpaper for a few seconds before scraping.
- Patience and Persistence: Some wallpapers, especially those with multiple layers or those that have been on the wall for a long time, may require more time and effort to remove. Be patient and persistent, applying additional removal solutions as needed. Take breaks if necessary to avoid frustration and ensure you're working effectively.
- Test small areas: Before applying a lot of solution or starting a large section, test a small area to see how the wallpaper responds. This will help you gauge how much solution and time is needed for effective removal.
- Consider professional help: If the wallpaper remains stubborn despite your best efforts, it might be worth considering professional help. Experienced professionals have specialized tools and techniques that can make the process faster and easier.
Conclusion
Removing wallpaper can be a time-consuming task, but with the right approach and tools, you can achieve great results. By gathering the necessary materials, preparing your room properly, and following the step-by-step instructions, you'll make the process more manageable and efficient. Whether you're scoring the wallpaper, applying the removal solution, or scraping off the wallpaper, each step is crucial in ensuring a smooth and clean surface.
By following these steps and tips, you'll be able to prepare your walls for a fresh new look. Whether you're redecorating or renovating, the effort you put into removing wallpaper will pay off in the end, providing you with beautifully prepared walls ready for painting or new wallpaper. Patience and persistence are key, and with a bit of hard work, you'll achieve the desired results.
explore further
Latest from Contemporary ideas
More from Innovations
Resources


Dwello, for every home buyer, is a way to go from 'I feel' to 'I know', at no extra cost.